
This view of the Owner’s Manual contains the very latest information, which may vary slightly from the printed Owner’s Manual originally provided with your vehicle. It may also describe content that is not on or operates differently on your vehicle. Please consider the Owner’s Manual originally provided with your vehicle as the primary source of information for your vehicle.

The information contained in this publication was correct at the time of release.In the interest of continuous development, we reserve the right to change specifications, design or equipment at any time without notice or obligation.No part of this publication may be reproduced, transmitted, stored in a retrieval system or translated into any language in any form by any means without our written permission.Errors and omissions excepted.
Copyright © 2024 Ford Motor Company
Charging the High Voltage Battery


 WARNING:
Do not use the 120 volt convenience cord with an extension cord, two-prong adapter, surge protector, timer or other adapter.
WARNING:
In Canada, do not use the 120 volt convenience cord in commercial garages.
WARNING:
This equipment has arcing or sparking parts. Do not expose to flammable vapors. Position this equipment at least
18 in (450 mm) above the floor.
WARNING:
The AC wall plug must fit firmly into the AC outlet. If the connection feels loose, worn or the AC outlet is damaged, please have a qualified electrician replace the AC outlet. Using a convenience cord with a worn outlet may cause burns, property damage and increase the risk of electric shock.
WARNING:
Do not use the 120 volt convenience cord with an extension cord, two-prong adapter, surge protector, timer or other adapter.
WARNING:
In Canada, do not use the 120 volt convenience cord in commercial garages.
WARNING:
This equipment has arcing or sparking parts. Do not expose to flammable vapors. Position this equipment at least
18 in (450 mm) above the floor.
WARNING:
The AC wall plug must fit firmly into the AC outlet. If the connection feels loose, worn or the AC outlet is damaged, please have a qualified electrician replace the AC outlet. Using a convenience cord with a worn outlet may cause burns, property damage and increase the risk of electric shock. |
Charging Equipment
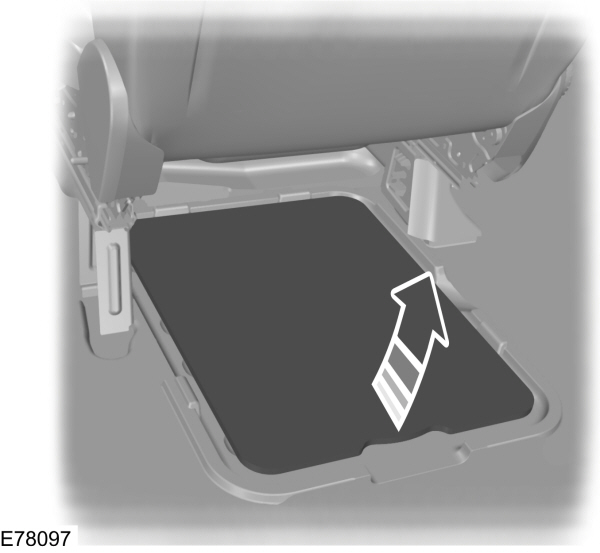
Your vehicle is equipped with a standard 120 volt convenience cord located in the floor compartment behind the driver seat.
Note:
The 120 volt convenience cord allows you to charge the high voltage battery using a standard 120 volt household outlet. It takes approximately seven hours to completely charge an empty battery using the standard 120 volt convenience cord.
We recommend upgrading to the optional 240 volt charging station for faster more efficient charging. It takes approximately 2.5 hours to completely charge an empty battery using a 240 volt charging station.
Your electrical source must meet certain requirements for the high voltage batteries to charge:- The AC outlet must be a three-prong 110-120 volt AC outlet that is properly grounded, 15–20 amps (or greater), and in good condition.
- You must use a dedicated line, which means you cannot have other appliances connected to the same circuit.
Note:
If you do not have a dedicated circuit, contact a licensed professional electrician for proper installation.
Make sure that the 120 volt convenience cord is completely unwound before charging. Always plug the cord into the AC outlet before connecting the charging coupler into the charge port on your vehicle.
120 Volt Convenience Cord
| A. B. C. D. |
Note:
When the convenience cord is plugged into an outlet, use the following table to determine your vehicle charge status. If the POWER indicator light is off after plugging in the convenience cord, use a different outlet.
| Convenience Cord LED Indicators | Status | |||||
|---|---|---|---|---|---|---|
| Check Outlet | Fault | Vehicle | ||||
| Off | Off | Off | The convenience cord is not connected to your vehicle. | |||
| Off | Off | On | The convenience cord is connected, but your vehicle is not charging. | |||
| Off | Off | Blink | Your vehicle is charging. | |||
| Off | Blink | Off | Ground Fault Circuit Interrupter (GFCI) Fault Detected. The convenience cord is retrying to charge. | |||
| Off | On | Off | Ground Fault Circuit Interrupter (GFCI) Fault Detected. The convenience cord has exhausted its retry attempts. Your vehicle is not charging, or there is an internal fault in the charging equipment. | |||
| Blink | Off | Off | The convenience cord detected a high temperature at the AC plug and is waiting for the AC plug to return to a normal operating temperature. 1 | |||
| Blink | Off | On | The convenience cord detected a high temperature at the AC plug. The AC plug has returned to a normal operating temperature. Your vehicle is ready to charge at a reduced current. 1 | |||
| Blink | Off | Blink | The convenience cord detected a high temperature at the AC plug. The AC plug has returned to a normal operating temperature. Your vehicle is charging at a reduced current. 1 | |||
| Blink | On | Off | The convenience cord detected a high temperature at the AC plug. Your vehicle is not charging. The convenience cord has exhausted its retry attempts. 1 | |||
| 1Have the outlet checked by a qualified electrician and make sure the AC plug fits firmly into the outlet. Contact an authorized EV certified dealer if problem persists. | ||||||
Note:
If charging for your plug-in vehicle fails, please call the Customer Relationship Center, or click on Call for support or Live chat at www.owner.ford.com.
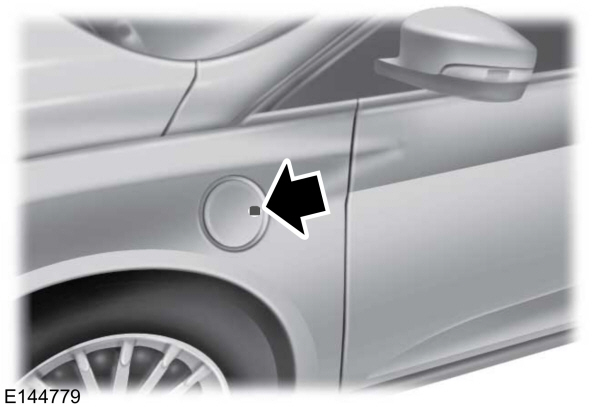
Charge Port
The charge port is located between the front left-hand side door and the front left-hand side wheel well. Press the indentation on the charge port door to open and close it.
Note:
Do not force the charge port door open or closed. Forcing the door open or closed damages the charge port.
You can modify the light ring illumination settings. The light ring located around the charge port indicates the charge status of the high voltage battery in your vehicle. Divided into four quadrants, the charge port light ring displays the state of charge in 25 percent increments.
You can press the unlock button on your key fob to view the charge status of your vehicle. Based on which quadrants light, you can determine the current state of charge. If the charge is below 25 percent, the light ring does not light. Do not forget to press the lock button on your key fob to re-lock your vehicle.
The light ring also displays the current state of charge when opening the doors.
The cord acknowledgment feature activates when you initiate a charge cycle. The four light quadrants each individually flash in a clockwise motion, starting with the top right-hand side light and ending with the top left-hand side, two times confirming that the system detects the charging coupler.
Charging
Note:
Your vehicle must be in park (P) to charge.
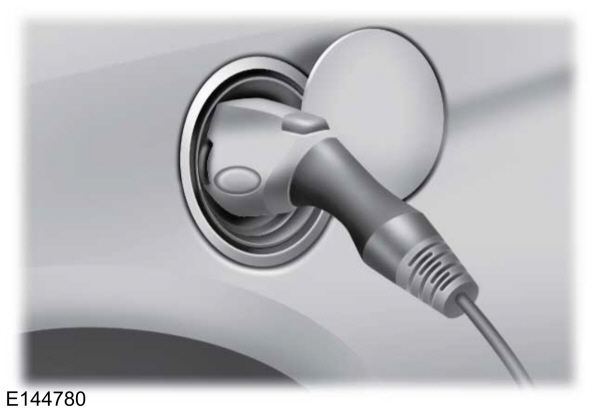
To charge your high voltage battery:
- Put your vehicle in park (P) and switch off your vehicle.
- Press the indentation on the charge port door to open it.
- Plug the charging coupler into the charge port on your vehicle. Make sure the button clicks confirming you have completely engaged the coupler.
- Verify that the cord acknowledgment feature activates. The cord acknowledgment feature activates when you initiate a charge cycle.
- If using a 240 volt charging station, follow the instructions on the charge station to begin the charging process.
- When the top right-hand side quadrant is pulsing, the charge is between 0-25 percent.
- When the top right-hand side quadrant is on and the bottom right-hand quadrant is pulsing, the charge is between 25-50 percent.
- When both right-hand side quadrants are on and the bottom left-hand side quadrant is pulsing, the charge is between 50-75 percent.
- When three quadrants are on and the top left-hand side quadrant is pulsing, the charge is between 75-100 percent.
- When all the lights on the light ring are on, the charge is complete.
Note:
The light ring will turn off one minute after reaching a full charge.
Locking the Charging Coupler
Note:
To lock the charging coupler, you need a padlock or a combination lock with a shackle diameter of
0.2 in (5 mm) or less. Also, the straight portion of the shackle must be
1.0 in (25.4 mm) or longer.
- Insert the lock through the hole in the charging coupler button.
- Lock the padlock or combination lock.
Waiting to Charge
When you select Value Charge, charging may not begin upon plugging in. The vehicle may delay charging to take advantage of off-peak electricity rates. The vehicle will optimize the charge schedule to be complete by the next GO Time.
When waiting to charge (not actively charging), the light ring will indicate the present state of charge of the high voltage battery as follows:- When the top right quadrant light is off, the charge is between 0–25 percent.
- When the top right quadrant light is on and the bottom right quadrant is off, the charge is between 25–50 percent.
- When both right side quadrant lights are on and the bottom left quadrant is off, the charge is between 50–75 percent.
- When three quadrant lights are on and the top left quadrant is off, the charge is between 75–100 percent.
- When all lights on the entire ring are on, the charge is 100 percent.
Note:
When the vehicle is waiting to charge, the light ring will turn off one minute after displaying the present state of charge. When the vehicle automatically begins charging, the light ring will turn on and display how far along the charge is per the section above.
Note:
If the system detects a vehicle charging system fault at any point in a charge cycle, the entire light ring will flash continuously for one minute and then turn off. If this happens, unplug the charging coupler and then plug it back into the charge port receptacle. If the problem persists, contact an authorized dealer.
You can modify the light ring lighting conditions by using the touchscreen system.
Disconnecting the Charging Coupler
Note:
Do not pull the wall plug from the wall while the vehicle is charging. Doing so may damage the outlet and the cord.
- Remove the lock from the charging coupler button.
- Press the button on the charging coupler.
- While holding the button, remove the charging coupler from the charge port receptacle on your vehicle.
- Close the charge port door by pressing the indentation on the charge port door. Continue pressing the indentation while the door rotates counterclockwise and closes.