
This view of the Owner’s Manual contains the very latest information, which may vary slightly from the printed Owner’s Manual originally provided with your vehicle. It may also describe content that is not on or operates differently on your vehicle. Please consider the Owner’s Manual originally provided with your vehicle as the primary source of information for your vehicle.

The information contained in this publication was correct at the time of release.In the interest of continuous development, we reserve the right to change specifications, design or equipment at any time without notice or obligation.No part of this publication may be reproduced, transmitted, stored in a retrieval system or translated into any language in any form by any means without our written permission.Errors and omissions excepted.
Copyright © 2024 Ford Motor Company
Jump Starting the Vehicle


 WARNING:
Batteries normally produce explosive gases which can cause personal injury. Therefore, do not allow flames, sparks or lighted substances to come near the battery. When working near the battery, always shield your face and protect your eyes. Always provide correct ventilation.
WARNING:
Keep batteries out of reach of children. Batteries contain sulfuric acid. Avoid contact with skin, eyes or clothing. Shield your eyes when working near the battery to protect against possible splashing of acid solution. In case of acid contact with skin or eyes, flush immediately with water for a minimum of 15 minutes and get prompt medical attention. If acid is swallowed, call a physician immediately.
WARNING:
Batteries normally produce explosive gases which can cause personal injury. Therefore, do not allow flames, sparks or lighted substances to come near the battery. When working near the battery, always shield your face and protect your eyes. Always provide correct ventilation.
WARNING:
Keep batteries out of reach of children. Batteries contain sulfuric acid. Avoid contact with skin, eyes or clothing. Shield your eyes when working near the battery to protect against possible splashing of acid solution. In case of acid contact with skin or eyes, flush immediately with water for a minimum of 15 minutes and get prompt medical attention. If acid is swallowed, call a physician immediately. |
Preparing Your Vehicle
Do not attempt to push-start your automatic transmission vehicle.
Note:
Attempting to push-start a vehicle with an automatic transmission may cause transmission damage.
Note:
Use only a 12-volt supply to start your vehicle.
Note:
Do not disconnect the battery of the disabled vehicle as this could damage the vehicle electrical system.
Park the booster vehicle close to the hood of the disabled vehicle, making sure the two vehicles do not touch.
If you see any corrosion on the battery or terminals, remove the cables from the terminals and clean with a wire brush.
Switch the heater fan on in both vehicles to protect from any electrical surges. Switch all other accessories off.
Connecting the Jumper Cables
|
WARNING:
Do not connect the end of the second cable to the negative (-) terminal of the battery to be jumped. A spark may cause an explosion of the gases that surround the battery.
WARNING:
Do not use fuel lines, engine valve covers, windshield wiper arms, the intake manifold, or hood latch as ground points. |
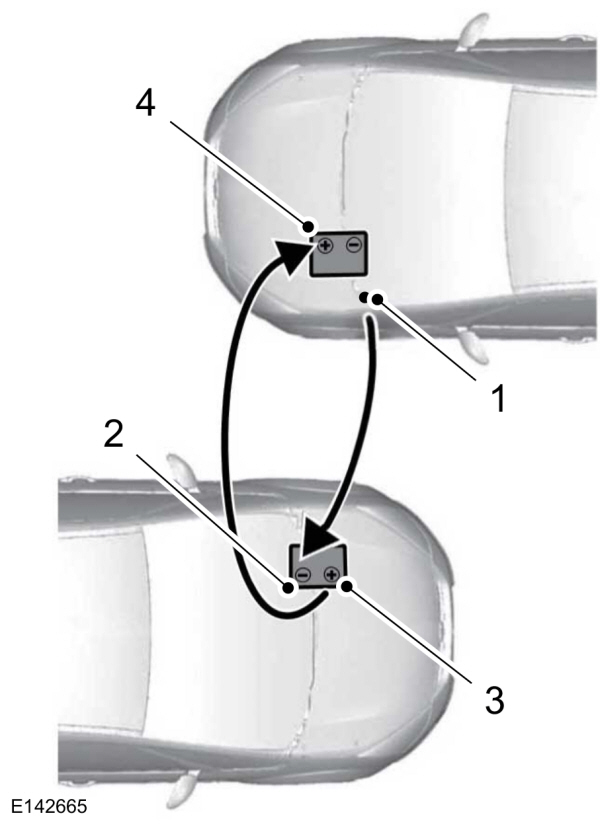
Your vehicle has a 12-volt battery that has two prongs accessible from under the hood. Your vehicle can be jumped the same way conventional vehicles can by using these prongs. The illustration below shows the two connector prongs used for jump-starting your vehicle.
| A B |
Note:
In the illustration, the bottom vehicle represents the booster vehicle.
- Remove the red cap from the positive prong (A) on your vehicle before connecting the cables.
- Connect the positive (+) jumper cable to the positive (+) terminal of the discharged battery.
- Connect the other end of the positive (+) cable to the positive (+) terminal of the booster vehicle battery.
- Connect the negative (-) cable to the negative (-) terminal of the booster vehicle battery.
- Make the final connection of the negative (-) cable to an exposed metal part of the stalled vehicle's engine, away from the battery and the fuel injection system, or connect the negative (-) cable to a ground connection point if available.
Make sure that the cables are clear of fan blades, belts, the moving parts of both engines, or any fuel delivery system parts.
Jump Starting
- Start the booster vehicle and press the accelerator pedal moderately.
- Start the disabled vehicle. Check the instrument cluster for the Ready to Drive light as the gasoline engine may not start, but the electric motor may be running.
- Once you start the disabled vehicle, run both vehicles for an additional three minutes before disconnecting the jumper cables.
Removing the Jumper Cables
Remove the jumper cables in the reverse order that they were connected.
- Remove the negative (-) jumper cable from the disabled vehicle.
- Remove the jumper cable on the negative (-) terminal of the booster vehicle battery.
- Remove the jumper cable from the positive (+) terminal of the booster vehicle battery.
- Remove the jumper cable from the positive (+) terminal of the disabled vehicle battery.
After disconnecting the jumper cables, let the disabled vehicle sit in Ready to Drive mode for several minutes to charge the 12V battery. The disabled vehicle can charge the 12V battery even if the gasoline engine is off. The 12V battery receives power from the high-voltage battery.